|
Configuration
To configure
TPC, use tray menu, or click the Configuration image in the main
window:

General
Start with Windows - allows you to
specify autorun option and where to store settings.
Don't show Power Plans - if checked,
all the buttons, images and menus connected with power plans will
be removed from user interface. If you don't use power plans, you
can check it to simplify interface. As Windows XP doesn't work with
power plans, this checkbox is always checked, and it is optional
for Vista and Windows 7 users.
Don't show battery charge information - disable
battery monitoring, used in desktop computers without UPS. Default
logo will be shown. It is possible to replace it with any 346x56
pixel image, just save it as skin_logo.jpg and put it to the
tpc.exe folder.
Hide main window when using Red Power Button - if checked,
the main window will automatically hide when you click Red Power
Button to show Power menu. When unchecked, the main window will not
be hidden automatically.
Command line for tray icon double click. Single click
on the tray icon is defined to show or hide main TPC window, but
you can also select a custom action for double click. You can run
any application or use any TPC power
feature, for example "tpc turnscreenoff" will turn off screen
when you double click the tray icon. Leave this field blank if you
don't need any double click action.
Power
Plans
This tab allows
you to select three favorite power plans to show in the main
window. You can select any power plans, including your custom power
plans. To do it, click "Update available plans table" button and
you should see all power plans in the bottom table. Select any
power plan, click right mouse button and select "Set as favorite
power plan 1(2,3)", and this plan will take its place in the upper
table. You can edit its name in the table, however, the new name
will be only used by TPC (Windows will use old name). It is not
recommended to edit GUIDs, but if you can't see a power plan in the
bottom table for some reason, you can enter it here
manually.
Screenshots
To access
screenshot menu, click right mouse button on the tray icon and
select "Screenshot
menu". To specify
hotkeys for creating screenshots, use "tpc
jpgscreenshot" to create a
jpg screenshot or "tpc
bmpscreenshot" to create a
bmp screenshot. It's not a command line, it's just a trick for
HotKey manager, so you can select any key combination to save
screenshots quickly!
Default folder for screenshots - this folder
will be used if you save screenshots without
confirmations.
File name datetime formatted - you can add
date and time to file name in desired format. It is used to make
different file names when you need to create a sequence of
screenshots without confirmations. Please note that simple text
should be wrapped in single or double quotes. Default value for
this field generates files like
Screenshot-20100215-105231345.jpg
Which is
15-Feb-2010, 10:52:31 and 345 milliseconds. Milliseconds are
recommended if you are going to create several screenshots every
second, otherwise one and the same file will be overwritten. The
default template for it is:
"ScreenShot-"yyyymmdd-hhnnsszzz
You can use the
following codes to create date and time:
|
Specifier
|
Displays
|
|
c
|
Displays the
date using the format given by the SysUtils.ShortDateFormat global
variable, followed by the time using the format given by the
SysUtils.LongTimeFormat global variable. The time is not displayed
if the date-time value indicates midnight precisely.
|
|
d
|
Displays the day
as a number without a leading zero (1-31).
|
|
dd
|
Displays the day
as a number with a leading zero (01-31).
|
|
ddd
|
Displays the day
as an abbreviation (Sun-Sat) using the strings given by the
SysUtils.ShortDayNames global variable.
|
|
dddd
|
Displays the day
as a full name (Sunday-Saturday) using the strings given by the
SysUtils.LongDayNames global variable.
|
|
ddddd
|
Displays the
date using the format given by the SysUtils.ShortDateFormat global
variable.
|
|
dddddd
|
Displays the
date using the format given by the SysUtils.LongDateFormat global
variable.
|
|
e
|
(Windows only)
Displays the year in the current period/era as a number without a
leading zero (Japanese, Korean, and Taiwanese locales only).
|
|
ee
|
(Windows only)
Displays the year in the current period/era as a number with a
leading zero (Japanese, Korean, and Taiwanese locales only).
|
|
g
|
(Windows only)
Displays the period/era as an abbreviation (Japanese and Taiwanese
locales only).
|
|
gg
|
(Windows only)
Displays the period/era as a full name. (Japanese and Taiwanese
locales only).
|
|
m
|
Displays the
month as a number without a leading zero (1-12). If the m specifier
immediately follows an h or hh specifier, the minute rather than
the month is displayed.
|
|
mm
|
Displays the
month as a number with a leading zero (01-12). If the mm specifier
immediately follows an h or hh specifier, the minute rather than
the month is displayed.
|
|
mmm
|
Displays the
month as an abbreviation (Jan-Dec) using the strings given by the
SysUtils.ShortMonthNames global variable.
|
|
mmmm
|
Displays the
month as a full name (January-December) using the strings given by
the SysUtils.LongMonthNames global variable.
|
|
yy
|
Displays the
year as a two-digit number (00-99).
|
|
yyyy
|
Displays the
year as a four-digit number (0000-9999).
|
|
h
|
Displays the
hour without a leading zero (0-23).
|
|
hh
|
Displays the
hour with a leading zero (00-23).
|
|
n
|
Displays the
minute without a leading zero (0-59).
|
|
nn
|
Displays the
minute with a leading zero (00-59).
|
|
s
|
Displays the
second without a leading zero (0-59).
|
|
ss
|
Displays the
second with a leading zero (00-59).
|
|
z
|
Displays the
millisecond without a leading zero (0-999).
|
|
zzz
|
Displays the
millisecond with a leading zero (000-999).
|
|
t
|
Displays the
time using the format given by the SysUtils.ShortTimeFormat global
variable.
|
|
tt\
|
Displays the
time using the format given by the SysUtils.LongTimeFormat global
variable.
|
|
am/pm
|
Uses the 12-hour
clock for the preceding h or hh specifier, and displays 'am' for
any hour before noon, and 'pm' for any hour after noon. The am/pm
specifier can use lower, upper, or mixed case, and the result is
displayed accordingly.
|
|
a/p
|
Uses the 12-hour
clock for the preceding h or hh specifier, and displays 'a' for any
hour before noon, and 'p' for any hour after noon. The a/p
specifier can use lower, upper, or mixed case, and the result is
displayed accordingly.
|
|
ampm
|
Uses the 12-hour
clock for the preceding h or hh specifier, and displays the
contents of the SysUtils.TimeAMString global variable for any hour
before noon, and the contents of the SysUtils.TimePMString global
variable for any hour after noon.
|
|
/
|
Displays the
date separator character given by the SysUtils.DateSeparator global
variable.
|
|
|
Displays the
time separator character given by the SysUtils.TimeSeparator global
variable.
|
|
'xx'/"xx"
|
Characters
enclosed in single or double quotation marks are displayed as such,
and do not affect formatting.
|
Pre-capture time - this is a delay
to allow Windows hide menus or confirmation dialog box before the
screen is captured. Windows 7 doesn't hide windows immediately, it
has a fade-out effect, and if you don't need it on your
screenshots, you should set a pre-capture delay. 300-500
milliseconds is OK for fast computers, and you need to increase
this value if you still see unwanted artefacts on your
screenshots.
JPG quality - set the
quality for JPEG files, the higher the value is , the larger the
resulting file becomes.
Screenshot timer - set the value
in seconds and the first screenshot will be created after that
time. If you create a sequence of screenshots, this value is also
used to specify the interval of time between
screenshots.
Execute timer N times - allows you to
create a sequence of screenshots. You can stop the timer before all
screenshots are created using
tray icon menu, screenshot submenu, "Stop timer"
command.
Autosave screenshots - if checked,
TPC will create file names automatically, otherwise a confirmation
window will be showed to select a folder and a file name for every
screenshot.
Remote
Control
Start server automatically - the remote
control will be turned on automatically any time TPC
starts.
Port - select any
unused port for your http server. Recommended ports are: 80, 8000,
8888, 8080...
Username and Password - you need to
enter this information any time you connect to your TPC remote
control.
Start - starts the
server.
Stop - stops the
server.
Test (localhost) - allows you to
test the server using local IP (=localhost). If the server is not
visible locally, it is quite possible that your firewall software
blocks it and you need to add and exception for TPC. To do it, read
the manual for your firewall. When your server works, you should
see something like this:
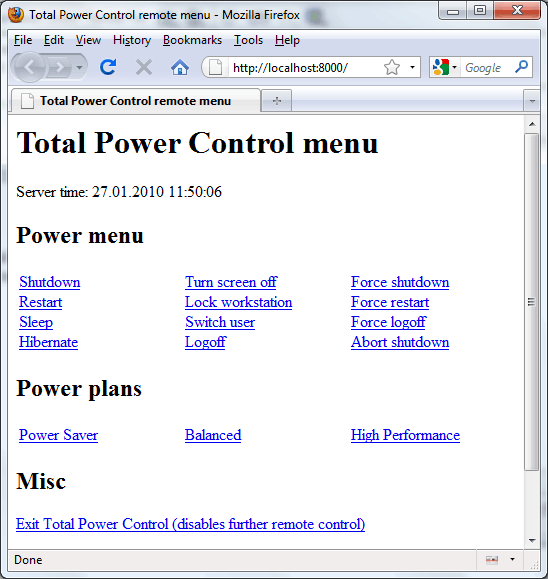
If you see the
server locally but don't see in from internet, you should also
check your firewall settings and verify that you specified correct
IP to address your server.
Timer
/ CPU Idle
CPU idle threshold - defines the
maximum CPU usage for idle state. If the CPU usage is below this
value, TPC will think that the system is idle. This value is used
by TPC Timer to check if the system is idle.
CPU measurement mode - TPC supports
two modes - Average and Peak. If Average is selected, TPC will
calculate average CPU load during the test period. When Peak is
selected, TPC will use the maximum CPU load that was observed
during the test period. Both modes have advantages and
disadvantages and should be more or less useful in different
circumstances. For example, when observing WinRAR backup work, it's
clear that the CPU usage is always more than 50% and the Average
mode can be used to find out the moment when WinRAR finishes it's
work, as the average idle state for most computers is 1-3% CPU
usage, much less than 50%. However, when dealing with database
software, the average CPU load may be as low as during the idle
state, but rare database requests may result in short CPU usage
increase which can be easily seen in Peak mode, thus giving more
appropriate results. The disadvantage of the Peak mode is that
Windows is always doing something and it's difficult to find ideal
peak value: if it's too high, TPC won't notice sluggish but useful
activity and if it's too low, the system will never meet the idle
state requirements (or it will take a long time!). It is also
important to understand that various antivirus, defrag, backup, etc
software may turn on automatically when the system is idle and
spoil the whole thing. Before using TPC CPU Idle meter for serious
things it is recommended to use CPU-Meter window to observe average
and peak values in idle state (when the computer is not used) and
add 3-5% to these values to be sure.
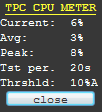
See the picture
and this is an example: after 20 seconds of measurement TPC found
that the average CPU load during idle state was 3% and the peak CPU
load was 8%. So the safe values are 3+3=6% if you are going to use
Average mode and 8+3=11% if you are going to use Peak mode.
Test period - this is a
period in seconds to calculate average and peak values. 20-30
seconds should be a good value in most cases. In difficult cases,
when it's hard to notice useful activity as the CPU usage is close
to the idle state, you should increase the test period and use Peak
mode to save TPC Timer from wrong activation.
Timer max away time - this value is
used to determine if the delayed Timer tasks should be executed if
the execution time happens to be in the past (for example, when the
computer was off at that time). The value is specified in minutes.
For example, the execution time was 16:00, the computer was off at
that time, now it is 18:00 and the computer is turned on. If
maxaway is less than 120 minutes (2 hours), the task will be
canceled and if maxaway value is higher than 120, the task will be
executed. Maxaway parameter is supposed to cover time for
unexpected reboot, i.e. 3-5 minutes is the recommended minimum for
this value. The value 0 means that the old timer will be disabled
as soon as TPC is started. If you need to run this task no matter
what, there is a checkbox "If
computer was not running at specified time, execute task at first
restart after" in the
TPC Timer window and it overrides the
maxaway value unless maxaway=0.
HotKeys
Hotkeys are
combinations of keyboard keys that allow you to run any Windows
application or command file even when TPC window is not visible. To
specify hotkeys for creating screenshots, use "tpc
jpgscreenshot" to create a
jpg screenshot or "tpc
bmpscreenshot" to create a
bmp screenshot. It's not a command line, it's just a trick for
HotKey manager, so you can select any key combination to save
screenshots quickly!
Assign key codes here - click this
field and press a combination of keys. This combination should
contain at least one CTRL, ALT or SHIFT key, or you may use them
all, for example, CTRL-ALT-Q or CTRL-SHIFT-F1. Unfortunately, this
field cannot catch WIN key and some specific keys, but you can
specify them as
Mod and
Vk parameters
manually (see below).
Mod and
Vk fields are used to set
up hotkeys manually, don't use them if you don't know the correct
key codes. Correct
Modifiers
are:
ALT = 1;
CONTROL =
2;
SHIFT =
4;
WIN = 8;
The combinations
are calculated automatically using "Assign
key codes here" field,
however, if you need WIN key, you should calculate manually. This
is simple. Only WIN key means the Mod is 8, CTRL+WIN means Mod is
2+8=10, CTRL+ALT+WIN means Mod is 1+2+8=11, SHIFT+WIN means Mod is
4+8=12... Now you can calculate
Modifiers.
Vk is a virtual
code of a key. Simple key codes should be assigned using
"Assign
key codes here" field. If this
field doesn't catch the required key, try looking it in the table
below. Some of them will not work, but you don't lose anything if
you try (don't forget to click "Add"
and "OK"
to actualize hotkeys.
{ Virtual Keys,
Standard Set }
LBUTTON =
1;
RBUTTON =
2;
CANCEL =
3;
MBUTTON = 4; {
NOT contiguous with L & RBUTTON }
XBUTTON1 =
5;
XBUTTON2 =
6;
BACK = 8;
TAB = 9;
CLEAR =
12;
RETURN =
13;
SHIFT =
$10;
CONTROL =
17;
MENU =
18;
PAUSE =
19;
CAPITAL =
20;
KANA =
21;
HANGUL =
21;
JUNJA =
23;
FINAL =
24;
HANJA =
25;
KANJI =
25;
CONVERT =
28;
NONCONVERT =
29;
ACCEPT =
30;
MODECHANGE =
31;
ESCAPE =
27;
SPACE
=32;
PRIOR =
33;
NEXT =
34;
END = 35;
HOME =
36;
LEFT =
37;
UP = 38;
RIGHT =
39;
DOWN =
40;
SELECT =
41;
PRINT =
42;
EXECUTE =
43;
SNAPSHOT =
44;
INSERT =
45;
DELETE =
46;
HELP =
47;
{
0 thru 9 are the same as ASCII '0' thru '9' ($30 - $39) }
{
A thru Z are the same as ASCII 'A' thru 'Z' ($41 - $5A) }
LWIN =
91;
RWIN =
92;
APPS =
93;
SLEEP =
95;
NUMPAD0 =
96;
NUMPAD1 =
97;
NUMPAD2 =
98;
NUMPAD3 =
99;
NUMPAD4 =
100;
NUMPAD5 =
101;
NUMPAD6 =
102;
NUMPAD7 =
103;
NUMPAD8 =
104;
NUMPAD9 =
105;
MULTIPLY =
106;
ADD =
107;
SEPARATOR =
108;
SUBTRACT =
109;
DECIMAL =
110;
DIVIDE =
111;
F1 = 112;
F2 = 113;
F3 = 114;
F4 = 115;
F5 = 116;
F6 = 117;
F7 = 118;
F8 = 119;
F9 = 120;
F10 =
121;
F11 =
122;
F12 =
123;
F13 =
124;
F14 =
125;
F15 =
126;
F16 =
127;
F17 =
128;
F18 =
129;
F19 =
130;
F20 =
131;
F21 =
132;
F22 =
133;
F23 =
134;
F24 =
135;
NUMLOCK =
144;
SCROLL =
145;
LSHIFT =
160;
RSHIFT =
161;
LCONTROL =
162;
RCONTROL =
163;
LMENU =
164;
RMENU =
165;
BROWSER_BACK =
166;
BROWSER_FORWARD
= 167;
BROWSER_REFRESH
= 168;
BROWSER_STOP =
169;
BROWSER_SEARCH =
170;
BROWSER_FAVORITES
= 171;
BROWSER_HOME =
172;
VOLUME_MUTE =
173;
VOLUME_DOWN =
174;
VOLUME_UP =
175;
MEDIA_NEXT_TRACK
= 176;
MEDIA_PREV_TRACK
= 177;
MEDIA_STOP =
178;
MEDIA_PLAY_PAUSE
= 179;
LAUNCH_MAIL =
180;
LAUNCH_MEDIA_SELECT
= 181;
LAUNCH_APP1 =
182;
LAUNCH_APP2 =
183;
Caption is used as a
reminder, you can edit it to add a description if you
like.
Command is used to
specify any executable or command file with or without parameters.
For example, use
"tpc screensaver" to run a
screensaver or
"tpc shutdown" to turn the PC
off. More TPC commands are here.
Add,
Update,
Delete buttons - this
is all understandable. To fill the form using the values from the
table, double click on any non-empty line of the table.
Examples:
| 1.
|
You want to run
calculator when pressing Ctrl-Alt-C. Go to "Assign
key codes here" field and
press Ctrl-Alt-C,
Mod and
Vk fields will be
automatically filled with 3 and 67. Now go to
command field and type
"calc".
Press "Add"
and "OK"
buttons. |
| 2.
|
You want to make
a jpg screenshot every time you press WIN-PrintScreen.
"Assign
key codes here" field doesn't
help here, but you can manually use
Mod for WIN =
8,
Vk for PrintScreen
= 44,
command is "tpc
jpgscreenshot". |
Go to main page.
|